Blog Hijau

BLACK CAT HACKS ORGANIZATION

BLACK CAT ORGANIZATION was built in 2006,with 2 hackers and now we have more than 2000 Hackers and Crackers.

WE ARE ANNONYMOUS

BLACK CAT HACKS ORGANIZATION is annonymous for all over the world.We are annonymous..

WE ARE HACKERS AND CRACKERS

In our Organization,many hackers are work for us.We also have lot of Crackers who crack sites,softwares and much more...

MISSION

We are PAKISTANIES and work against enimies of Pakistan.

RANKS

COMMAND > Diamond Lion > Gold Lion > Silver Lion > 8* > 7* > 6* > 5* > 4* > 3* > 2* > 1* > 3 Dot > 2 Dot > 1 Dot > Begginer

Thursday, 28 March 2013

Learn To Hide Files Behind The Images

hide files behind images

There are some important  files or document you want to hide from others on your computer. To do that you might be creating folder inside folder to hide such files but in todays tutorial i will change this by teaching you a interesting trick to hide files behind images.To hide a file behind a image  means that if any one opens that image he will see the image, but to see the hidden file we need to open that image in a specific way. So lets get started.

How To Hide File Behind Image ?

In order to do this you should have basic understanding of command line, but if you don't know check out  tutorial given below.
1. Select an image to be used for hiding file behind the image.
2. Now select a file to hide behind the image and make it in .RAR format. With the help of the WinRAR.
3. And most important is that paste both the files on desktop. You may do this anywhere instead of desktop if you have some basic understanding of command line.
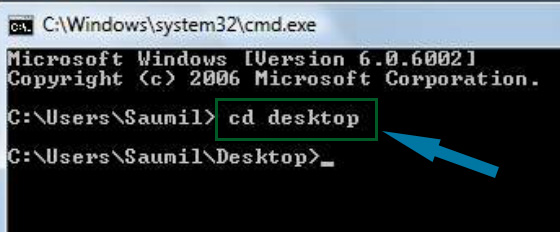
4. Now open cmd by going to Start > Accessories > Command Prompt and type following commands in it.
cd desktop
hide files behind images

5. CD stands for change directory by typing above command you change your directory to desktop. After that type command given below.
 Copy /b imagename.jpg + filename.rar finalimage.jpg
hide files behind images
  • Replace imagename.jpg with the name of image you want your file to be hidden behind. Don't forget to add image format (Eg: .jpg,.png,.gif)
  • Replace filename with name of your file you want to hide. It must be in .rar format.
  • Finally Replace finalimage.jpg with whatever name you want your final image with hidden files should be. This is the image where your file will be hidden.
6. Now when you will try to open this newly created image it will open as normal image, but to open you hidden file you need follow steps given below.

How To Access Hidden File ?

To access your hidden file you need to open the newly created image in winrar. Just follow simple steps given below to do that.

    1. Open winrar
    2. Now locate your image and open it or simply drag your image in winrar.

Saturday, 23 March 2013

Simple Trick To Use Web Browsers As Text Editor

 Web Browsers As Text Editor
In this tutorial i will show you a simple and interesting trick to use your web browser such as Google Chrome or Mozilla Firefox as a simple text editor like Notepad. This trick works on all web browsers. So lets get started.

How To Do ?

   1 Copy below code in browser Url Section

 data:text/html, <html contenteditable>

   2. Now Press Enter.
   3. Now you can type anything as would do on any other text editor like Notepad.
   4. To save your text file Press Ctrl + S and save it as anything.txt (.txt Is Must)

Some Cool Tricks

Thursday, 21 March 2013

Controlling Raspberry Pi via text message

This script enables you to control your computer via text message. Think of it almost as a version of SSH over text message.

It is designed to intelligently and quickly check unread Google voice messages. If certain parameters are passed, it runs the command you send and returns the result.
This is the third script in my AUI (Alternative User Interface) Series.
This requires curl and libboost1.50-regex. The setup script can install curl and boost regex. 

NOTE: This will work with any linux OS but I am using it on the Raspberry Pi so if you are using something else, you will have to compile it yourself (make sure to change the Makefile flags).

The stable version is on github here:

And the working copy source can be found here:
http://stevenhickson-code.googlecode.com/svn/trunk/AUI/TextCommand/


Google Voice unfortunately doesn't have an API available so I started writing my own.
I found this page and this page which were good references. Unfortunately, neither of these actually worked, so I wrote my own based off them. The script will install this and you are free to use it however you want as long as you cite me and follow GPLv3.

It works by using cron to run a script once every minute. The script checks your unread inbox messages and uses curl to make sure certain safety parameters are met. It is very important to check the unread inbox as it only pulls a 1-3 KB file rather than a 150+ KB file. This really adds up once a minute over time. If certain parameters are met, ie it has a valid phone number and command, then it runs the command you give it. The results of the command are then texted back to you. 
This will not work with interactive scripts like more or man


Installation Instructions

(this requires git)

sudo apt-get install git-core
git clone git://github.com/StevenHickson/PiAUISuite.git
cd PiAUISuite/Install/
./InstallAUISuite.sh

Update Instructions 

cd PiAUISuite
git pull
cd Install
sudo ./UpdateAUISuite.sh


There are other scripts in here that you can ignore. It will ask you the username details in the script.
This will be your Google voice username, password, key, and valid number.

Your Google voice username will be your e-mail. For example:
John.Doe@gmail.com
Your password is your Google voice password:
ThisIsntMyPassword
The key is the valid command-word that proceeds commands to the machine. For example, mine is Cmd. So I text:
Cmd ls
to have the pi text the results of the current directory back.
Your valid number is the phone number you want your google voice to receive commands from (Not your Google voice number!). You must put the country code but not the + sign. Ex:
15553332222

After that everything should work.
Note, I worked out a few major bugs with the install script and it is reposted now. So make sure to get the newest version.

Consider donating to further my tinkering


Places you can find me


Monday, 18 March 2013

Using a webcam with the Raspberry Pi

There is a lot of recent motivation to do image processing and computer vision tasks on the Raspberry Pi.
Luckily OpenCv is already built on Raspbian and Wheezy.

To install it, all you have to do is use apt-get like below:
sudo apt-get install libcv-dev libopencv-dev libcv2.3 opencv-doc

You may also want to install python opencv
sudo apt-get install python-opencv

To see all available opencv packages, type:
sudo apt-cache search opencv

You can test your opencv installation and webcam by downloading and running the script below:
http://stevenhickson-code.googlecode.com/svn/trunk/AUI/Imaging/test

You may have to make this program executable by running:
chmod +x test

The source code and makefile can be found here:
http://stevenhickson-code.googlecode.com/svn/trunk/AUI/Imaging/

If everything works, you should get a result like the one below (Apologies for the terrible quality, its a really old webcam):

  
I used scrot to take the screenshot
sudo apt-get install scrot

Thanks to Ethan Miklancic for hiding behind my laptop in the picture. I recommend using C or C++ rather than python because it makes a HUGE difference in speed.


Good Luck! 

Consider donating to further my tinkering.


Places you can find me

Guest Posts Now Accepted At Cool Hacking Tricks

guest postings

I am please to announce that we are now accepting Guest posts on our blog Cool Hacking Tricks. In return you will get backlink and large amount of traffic from our blog. Guest Author Name and Blog details will be posted below each post he write. So don't miss your chance to increase traffic to your blog. We accepted post related to Computer Tricks & Tips, Hacking, Mobile Tricks, Facebooks Tips & Tricks and other topics related to web and techology.

    Why To Write For Us ?

    Our Blog recieves Thousands of Pageviews daily and is constantly growing. We have more then 1400+ Email Subscribers and over 3500+ Facebook Fans so you can imagine amount of traffic we get daily. So by writing for us you can drive lots of traffic to your blog or website As Guest blogger widget with his name and his blog or website details will be placed below each post he write. So if you are interested check out below details on how to apply.

    Topics Accepted

    • Computer Tricks & Tips
    • Hacking Related Stuffs
    • Mobile Tricks
    • Facebook Tricks
    • Javascript Tricks
    • Anything Related To Web & Technology

    How To Apply ?

    Write a Good post or tutorial on any of the topic listed above. Do Not Copy and Paste from other blogs or websites. You can write what other blog have already published but write it in your own way, in your style and send me that via following method.
    • Send Me Email To ndark14@gmail.com
    • Or Contact me Via our Contact Form By Clicking Here 

      Wednesday, 13 March 2013

      Blocking Facebook On Your Computer

      I had previously posted about Blocking And Unblocking any websites on your computer. In this tutorial i will teach you to specifically block facebook on your computer. This might be helpfull if you want to prevent students from using facebook in school and colleges or your employees in office. If you are parent and don't want you child to use facebook or any other particular site then follow simple steps given below. So lets get started.

      How To Block Facebook ?

      1. Go to Start > Programmes > Accesories
      2. Then Right click on Notepad and Run it as administrator.
      3. Now open host file by clicking on File > Open and locate to following address

           C:\WINDOWS\system32\drivers\etc

      4. Then just below # 127.0.0.1 localhost paste folowing code

      # Blocking Facebook
      127.0.0.1 login.facebook.com
      127.0.0.1 www.facebook.com
      127.0.0.1 apps.facebook.com
      127.0.0.1 blog.facebook.com

      5. Now save the host file and done.
      6. Open any browser and try to open facebook. It won't open. If facebook opens then you might have done somthing wrong. (let me know if you face any problem)

      Blocking Other Website

      If you want to block website other then facebook then change facebook address with whatever website you want to block. For example: to block google paste following code below # 127.0.0.1 localhost

      # block google
      127.0.0.1 www.google.com

      Any Question

      If you find any difficulty blocking facebook on your computer then leave a comment below i will be glad to help you out. You also like to read some  interesting tutorial given below.

      How To Download Facebook Videos ?

      Hi Friends ....and Facebook Users I Have A Awesome Trick For You All.........!Must Read Below.
      How To Download Facebook Videos ?While watching videos on Facebook Sometime you like certain video and want to download it on your computer but you are taken a step back because you don't know how to Download A Video From Facebook..! Downloading videos from Facebook is something you are not familiar with it..! Downloading Facebook videos is very very easy and the best thing about  it is that it does not require any software. In this Article i will Try To Teach You, How to download videos from Facebook in few simple steps. See Below....!

      How To Download Facebook Videos ?

      1. Open the Facebook video you want to download in Your Computer
      2. Copy the URL Of Video.
      3. Go to save from By  Clicking Here
      4. Paste URL copied in Step 2 in input area Of Save From Website Then Click On Download Button
      5. After Clicking on Download Button, Available Video format for the video will Appear on Right Side, You Have Choices For Your Video Select MP4 For HD Video Any Other For Other Formats As You Like..!
       6. Downloading Will Start Automatically Just Wait For Some Seconds...! :)

      Thursday, 7 March 2013

      Finding Ip Address Of A Website Using Command Prompt Or CMD

      In this tutorial i will teach you to find Ip Address of any website using Command Prompt or in short CMD. Using IP Address you can find location of the website server and do more stuff. I will demostrate this tutorial with Google but you can use this method to find IP Address of any website like twitter, facebook etc. So lets get started.

      How to find IP ?

      1. Go to Start > Type CMD and press Enter.
      2. Now write Ping followed by website URL whose IP you want to find.
      finding ip adddress of website

      3. It will take less then a second and come up with the results as shown below.
      finding ip adddress of website

      In  my next post i will show you another easy way to find website IP Address and teach you to use this IP to find its location.

      You may also like to read: